GitHub Codespaces is a cloud-based development environment that allows developers to code, build, and test their applications directly from the browser or through Visual Studio Code.
Key Points
- Cloud-Based: Development environment runs in the cloud, eliminating the need for local setup.
- Customizable: Configuration files allow tailoring of the environment.
- Collaborative: Facilitates real-time collaboration among developers.
- Seamless Integration: Works directly with GitHub repositories and CI/CD pipelines.
Let’s start with the steps that you need to take to use your XM cloud in GitHub codespace.
- In your repository, create a folder called .devcontainer
.In that folder, create a configuration file called devcontainer.json.
// For format details, see https://aka.ms/devcontainer.json.
// README at:
//https://github.com/devcontainers/templates/tree/main/src/dotnet
{
  "name": "Add Your Desired Codespace Name Here",
  // Or use a Dockerfile or Docker Compose file. More info: https://containers.dev/guide/dockerfile
  "image": "mcr.microsoft.com/devcontainers/dotnet:1-6.0",
  "features": {
    "ghcr.io/devcontainers/features/node:1": {
      "nodeGypDependencies": true,
      "version": "lts",
      "nvmVersion": "latest"
    }
  },

  // Use 'forwardPorts' to make a list of ports inside the container available locally.
  "forwardPorts": [3000],
  "portsAttributes": {
    "3000": {
      "visibility": "public"
    }
  }
}
In this file, we are setting up Codespaces with these steps:
- Choose the Base Image: We use a dotnet v6 image for development. This helps us use the Sitecore dotnet tool. When the tool updates to dotnet 7.x, we’ll change the base image.
- Add Node LTS: We include Node LTS to run the Next.js application.
- Set Up Port 3000: We configure port 3000 for Codespaces to use and make it public so it can be accessed by Pages.
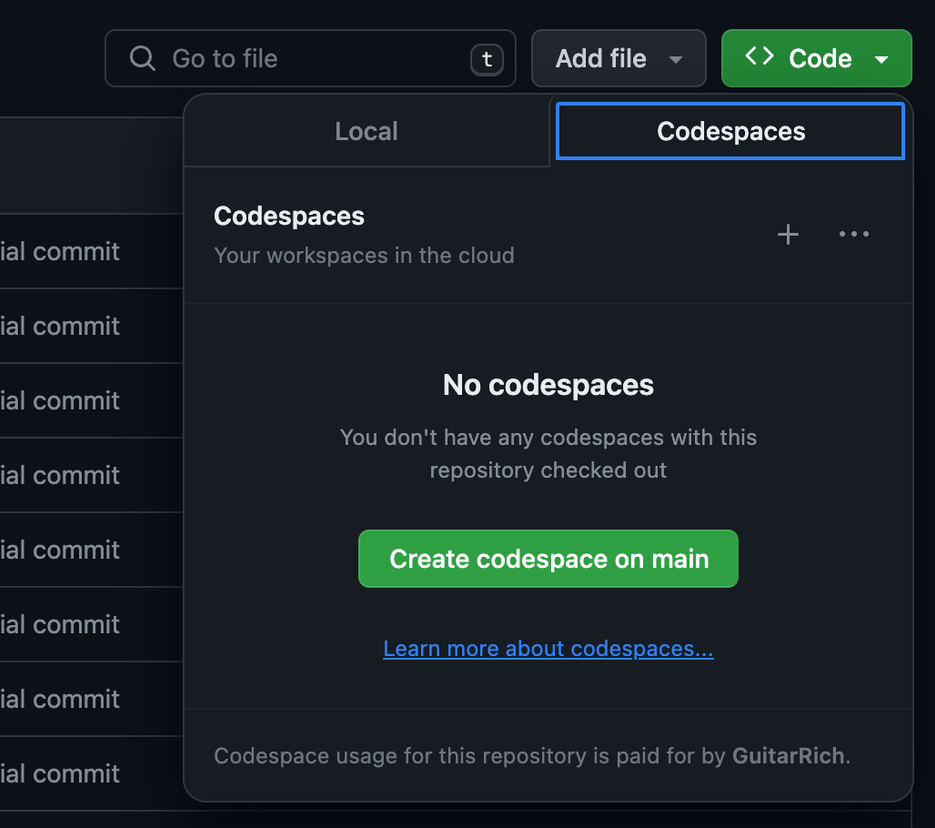
2. Setting up your codespace on GitHub is easy. Go to the code page of your repository and click the green “Code” button on the right. Then, switch to the “Codespaces” tab and click the “Create codespace on main” button.
This will open a new tab with your codespace being created. The configuration devcontainer.json will include all the required resources to run your web application.
3. Navigate to the folder containing your Next.js application. Add an .env.local file or make a copy of .env and rename to .env.local and populate the following environment variables with the values from your XM Cloud instance
JSS_EDITING_SECRET=<Get the editing secret from <xmcloud CM URL>/sitecore/admin/showconfig.aspx
SITECORE_API_KEY=<Get the API key from the XM Deploy app>
SITECORE_API_HOST=<The URL of your XM Cloud CM instance> SITECORE_SITE_NAME=<Your site name>
JSS_APP_NAME=<App Name>
GRAPH_QL_ENDPOINT =<The URL of your XM Cloud CM instance>/sitecore/api/graph/edge
4. In terminal, run the following commands:
npm install
npm run build
Fix issues if any.
npm run start:connected
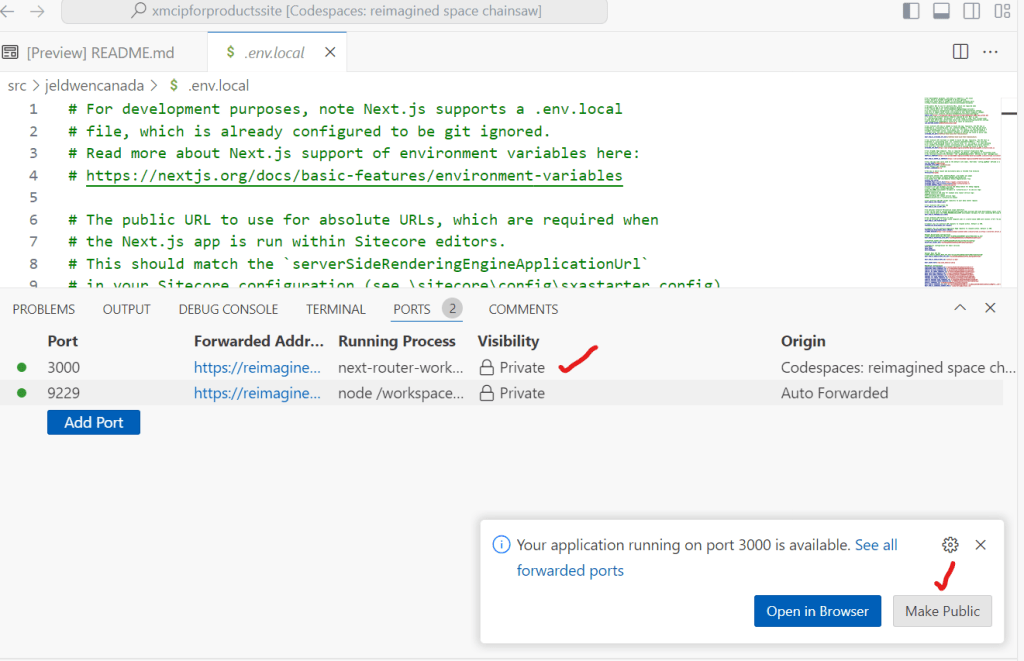
5. Make sure your site is visible
To enable the application to be used by Pages, first ensure that the URL is public. In Codespaces/VS Code, click on the Ports tab. There you will see a list of forwarded ports for your application. You are only interested in port 3000.
6. Create a rendering host (sitecore/system/Settings/Services/Rendering Hosts) that points to Codespace site
Server side rendering engine endpoint URL– enter your codespaces application URL (Copy the forwarded address for port 3000), followed by the path: /api/editing/render.Server side rendering engine application URL– enter your codespaces application URL.Server side rendering engine configuration URL– leave blank.Application name– set to your JSS application name.
7. Create your development Site Definition item, navigate to <site root>/Settings/Site Grouping. Insert a new Site item.
Set the following fields:
Predefined application rendering host– set this to the new Rendering Host created in the step above.Site name– set this to match your application nameHostname– set this to your Codespaces forwarded URL for port 3000
We also need to change the Hostname field on the original Site item. By default it will be set to * which will override your new Site item mapping.
Once this is all setup, Pages will connect to your application running in Codespaces.
NOTE: Are you facing issue of slowness and has latency with Codespace? Looks like region chosen is causing it. Set the region by yourself manually.
Hope this helps, Good luck!

Leave a comment